
latest
habitat tv

Say goodbye to the morning scramble for keys, coats and sunglasses and hello to this… see this and more videos
blog

Restoring memories: A bath with a colourful new life
Within a heritage-listed homestead, amidst the serene beauty of nature, lay a unique piece of… more
Share the love on World Kindness Day by painting kindness rocks
10 Nov 2022
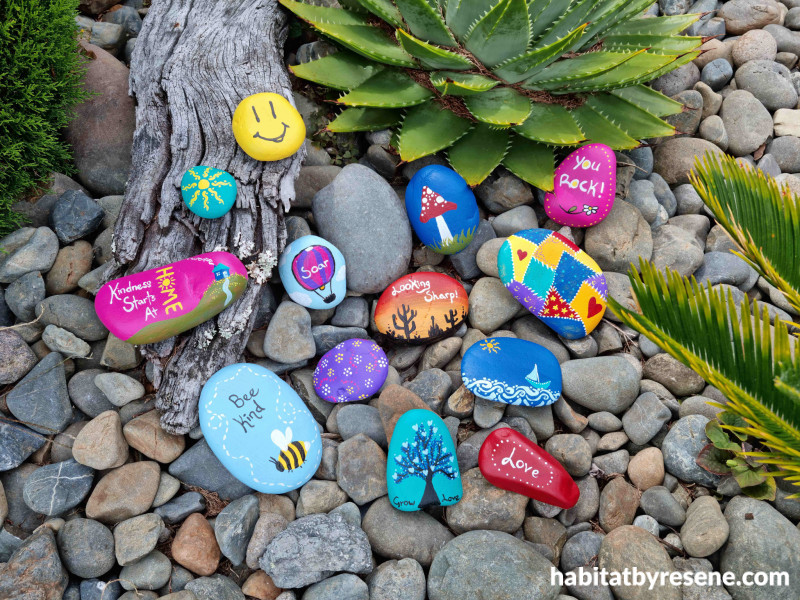
World Kindness Day is fast approaching on Sunday 13 November. Share a bit of kindness with the world by creating kindness rocks painted in your favourite Resene colours. You might want to give a kindness rock to friends and family or hide them in your local park and share the love with a stranger. There are many parks in New Zealand and Australia that are known to be places where rock painters hide their rocks for people to find. Search on Facebook to find a rock art group near you.
You will need:
- Stones, rocks or pebbles
- Testpot brush
- Small craft brush
- Your choice of Resene testpots – Sarah used Resene Surfie Green, Resene Bright Spark, Resene West Side, Resene Scrumptious, Resene Salsa, Resene Alabaster, Resene Cobalt, Resene French Pass, Resene Daisy Bush, Resene Bluetooth, Resene Saratoga and Resene Black

Step 1: Wash your rocks to remove any dirt or debris, then let them dry in the sunshine.
Step 2: Using your testpot brush, paint a base Resene colour of your choice on your rock, then leave to dry. You can repeat this step two or three times to make your colour bolder.
Step 3: Paint a design of your choosing onto your rock using a range of Resene colours and a small craft brush.
Step 4 (optional): You can use Resene Clearcoat UVS or Resene Art Action Glaze gloss if you want your rocks to have a glossy finish. Then, hide your kindness rocks in the garden for someone else to discover!
Here’s some ideas for your kindness rocks:

Bee Kind Rock
Step 1: Wash your rock and let it fully dry in the sunshine.

Step 2: Using your testpot brush, paint a base of your choice of Resene colour onto the rock – Sarah used Resene Bluetooth. Leave to dry.

Step 3: To paint the bee, use yellow paint – Sarah used Resene Bright Spark – to paint the shape of a lemon with a small craft brush.

Step 4: Use a small craft brush to paint a black oval on one side of the bee’s body. Sarah used Resene Black. Then, paint three curved stripes on the bee’s body.

Step 5: Add in smaller details, Sarah used a small craft brush and Resene Black to paint the bee’s antennae and legs. Use white paint, Sarah used Resene Alabaster, to paint a small fluffy tip on the end of the bee. You can paint a flight path around the edge of the rock by painting small dashes in wavy lines. For this, Sarah used Resene Alabaster.
Step 6: Add an extra piece of kindness to your rock with words. Write your words in pencil first to get the spacing right, then paint them in your choice of Resene colour – Sarah used Resene Black for her words. Your kindness rock is ready to take flight!
Patchwork Love Rock

Step 1: Wash your rock and leave to dry, then paint your base colour with a testpot brush – Sarah used Resene West Side.

Step 2: Divide your rock into squares and triangles with a pencil.

Step 3: Paint sections of your rock different colours with a testpot brush – Sarah used Resene Cobalt, Resene Bright Spark, Resene Salsa, Resene Surfie Green and Resene Daisy Bush. She left some of the squares blank for the Resene West Side to show through.

Step 4: To paint the ‘seams’ of your patchwork rock, use a small craft brush and your choice of Resene colour – Sarah used Resene Alabaster to add contrast – and paint a mixture of small lines and dots along the edge of where your colours meet.

Step 5: Use a small craft brush and a variety of Resene colours to paint hearts, smiley faces, dots, lines or flowers onto the patches of your rock. Sarah used Resene Bright Spark, Resene Salsa, Resene Surfie Green and Resene Daisy Bush. Your patchwork rock is complete!
Heart Tree Rock

Step 1: Wash your rock and leave to dry, then paint your base colour with a testpot brush – Sarah used Resene Surfie Green.

Step 2: To paint the trunk of the tree, Sarah used Resene Black to paint a triangle near the base of the rock.

Step 3: Use your choice of Resene colour – Sarah used Resene Black – and a small craft brush to paint some branches stemming from the top of your triangle.

Step 4: To begin the leaves, use your choice of darker colour – Sarah used Resene Cobalt – to paint dots all around your branches. If your rock is big enough, you could dip a cotton earbud into your chosen colour and use it to create the dots.

Step 5: In a lighter colour – Sarah used Resene Bluetooth – paint a few hearts with a craft brush so they look like they are growing from the tree like apples.

Step 6: To add a bit more detail, use your cotton earbud or craft brush to paint scattered small dots over the top of a few of your darker dots. This will give the tree and leaves a sense of depth.

Step 7: Use your choice of colour – Sarah used Resene Black – to paint grass or encouraging words beside the base of the tree.
project and images by Sarah Kolver
Published: 10 Nov 2022
more inspiration

Show your support this ANZAC Day with this DIY wreath
Anzac Day is a national day of remembrance in New… more

Sunny side up: Bookends for any weather
Brighten up your bookshelf and organise your books at the… more

A roar-some dish: DIY animal plates
Impress your guests with these DIY animal plates! The Resene… more

Glowing zoofari: Make your own animal themed lamp
Here’s a great DIY to do with the kids over… more

Hop into Easter with these fun DIY projects for the whole family
With Easter looming, we want to bring you more fun… more


 look book