
latest
habitat tv

Say goodbye to the morning scramble for keys, coats and sunglasses and hello to this… see this and more videos
blog

Restoring memories: A bath with a colourful new life
Within a heritage-listed homestead, amidst the serene beauty of nature, lay a unique piece of… more
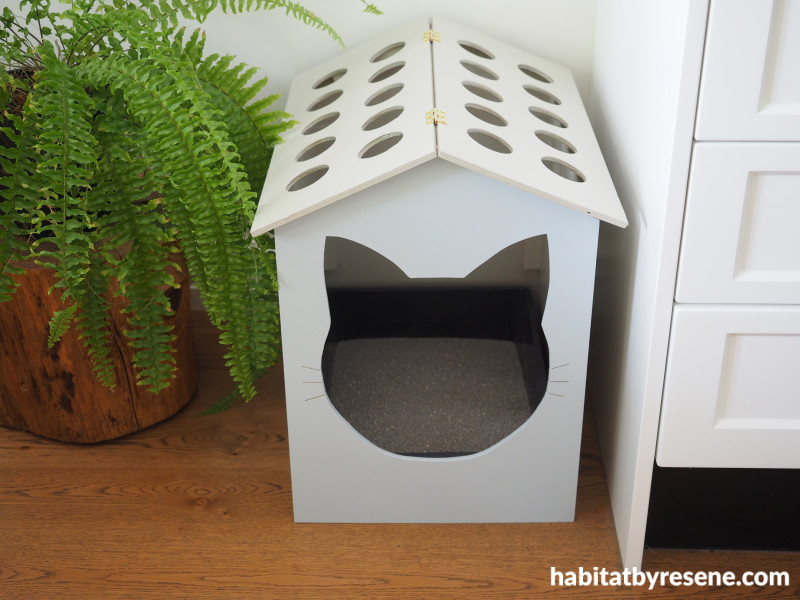
This DIY litter house is a ‘cat’ above the rest
03 Mar 2023
Your cat will be ‘feline’ like a million dollars having their own trendy litter house to do their business. It will also help to hide the messy or smelly litterbox when you have guests over. With so many Resene paint colours to choose from, you can create a litter house that will blend into the surrounding colour scheme of your home and match your interior.
What you need:
- 2 sheets of 7mm thick plywood 600mm x 1200mm, untreated
- Saw
- Computer printout of a cat face silhouette or draw your own
- Scissors
- Sellotape
- Pencil
- Electric drill
- Jig saw
- Sandpaper
- Wood for blocking
- Wood glue
- Wood filler
- Hole saw
- Resene Quick Dry
- Paintbrush
- 2 hinges
- Cat litter tray
- Cat litter
- Resene Lustacryl paints in your choice of colours, Fleur used Resene Casper, Resene Napa and Resene Tea

Step 1: Start by measuring the size of your cat litter tray and work out how big you want to make your house. Make the pieces out of 7mm thick untreated plywood. The two sides of Fleurs house are 43.5cm long and 40cm tall, the front and back are 33.5cm wide, 40cm tall at the sides and the peak is 48cm tall.

Step 2: Find a silhouette online of a cat’s face and print this out so that it is big enough for your cat to walk through, this is the door. Or freehand draw your own cat face shape. Use scissors to cut this out, position it where you want, stick it down with a bit of sellotape and trace around it with a pencil. Remove the printout and with a drill, drill a hole inside the pencil outline and then use a jig saw to cut out the cat face. Use sandpaper to sand any rough edges smooth. Wipe off all sanding dust.

Step 3: Use some strong wood glue to glue the four sides of the house together, using some blocking wood in the corners for a stronger construction. You could also drill some screws into the blocking to make is extra strong. If you add blocking, make sure you position it high enough up from the bottom so that the house will still sit over the litter tray okay.

Step 4: While the glue is drying, start work on the roof. Fleur cut her two roof panels to 49cm long by 20.5cm wide. Use a 5cm hole saw attachment on your electric drill to make 10 ventilation holes. These holes will also help the cat feel safe and like they are not too enclosed. Make holes in both panels and sand any rough edges smooth. Wipe off sanding dust.

Step 5: Prime the entire house and the two roof panels with Resene Quick Dry.

Step 6: Paint the roof panels in two coats of your chosen Resene paint colour. Fleur used Resene Napa. Glue one of the panels in place. Once dry, sand these flat and prime with Resene Quick Dry.

Step 7: Complete by painting the inside with your chosen Resene colour. Fleur used Resene Tea with the front in Resene Casper and the remaining two sides and the back in Resene Napa. Finish by screwing hinges to the roof panels so that one panel opens, fill your cat litter tray with cat litter and then place the house over the top of the tray.
Wall painted in Resene Carrara.
project and images Fleur Thorpe
Published: 03 Mar 2023
more inspiration

Show your support this ANZAC Day with this DIY wreath
Anzac Day is a national day of remembrance in New… more

Sunny side up: Bookends for any weather
Brighten up your bookshelf and organise your books at the… more

A roar-some dish: DIY animal plates
Impress your guests with these DIY animal plates! The Resene… more

Glowing zoofari: Make your own animal themed lamp
Here’s a great DIY to do with the kids over… more

Hop into Easter with these fun DIY projects for the whole family
With Easter looming, we want to bring you more fun… more


 look book