
latest
habitat tv

Say goodbye to the morning scramble for keys, coats and sunglasses and hello to this… see this and more videos
blog

Precision and vibrancy with artist Cap Jacobs
Cap Jacobs is a New Zealand-based artist whose work stands out for its precision, vibrant… more
How to hang Resene paste-the-wall wallpapers
22 Sep 2022
Hanging wallpaper is a lot easier than it used to be. 60 to 80 per cent of wallpapers are now non-woven (synthetic) paste-the-wall designs, which are easy for wallpaper newbies. The days of pasting strips of paper on a table before wallpapering are a thing of the past.
“Paste-the-wall designs are easy for beginners,” says Resene Wallpaper Expert Ingel Janssen. “These designs are non-woven, which means they are synthetic and often made from innovative materials.
“As you’re pasting synthetic wallpaper to the wall directly, the wallpaper won’t shrink or expand, and it won’t change colour like old-school wallpapers used to.”
How to hang paste-the-wall wallpapers
You will need:
- Resene Interior Paintwork Cleaner
- Plaster filler
- Sandpaper
- Resene Sureseal pigmented sealer
- Clean lint-free rags
- Scissors
- Wallpaper size, such as Shurstik
- Tape measure
- Pencil
- Plumb bob or level
- Wallpaper roller and sleeve
- Bucket
- Wallpaper paste (premixes are an easy beginner option)
- Rubber press roller or a wallpaper brush
- Straight edge
- Snap-edge knife

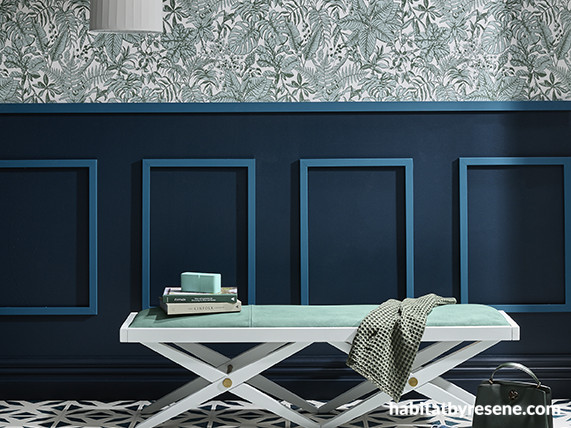
Resene Wallpaper Collection 37520-2 (top wall) is an easy-to-hang paste-the-wall design. Bottom half of wall painted in Resene Tangaroa with battens in Resene St Kilda. The floor pattern is created with Resene Rice Cake with a stencil design in Resene FX Paint Effects Medium mixed with Resene Tangaroa. The Resene FX Paint Effects Medium was applied through a stencil using a flat artist’s brush to create a ‘glazed tile’ look. Project by Kate Alexander, image by Bryce Carleton.
Step 1: Prepare painted walls by cleaning them with Resene Interior Paintwork Cleaner and fill in any gaps with a plaster filler before sanding.
Step 2: Seal with a Resene Sureseal pigmented sealer, allowing it to cure before wallpapering. On painted walls, Resene Sureseal aids adhesion of the wallpaper, and on unpainted paper faced walls prevents the paste from being absorbed into the plaster, negates opacity issues, and creates a consistent surface for applying wallpaper. Sand with 80-grit sandpaper and wipe down with a clean, damp cloth.
Step 3: Apply a coat of wallpaper size, which allows for better ‘slip and slide’ when hanging wallpaper and makes it easier to line up patterns. “Size is a paste that you put on the wall before applying wallpaper paste, which creates a key to the substrate, gives extra grip for wallpaper paste and essentially makes wallpaper super easy to work with,” says Ingel.
Step 4: Measure the distance of the skirting to the ceiling or scotia. Measure the wallpaper to this length, allowing an overhang of 10cm at the top and bottom. “This is so you don’t run out of paper at the bottom and have something to hang onto if you need to reposition the wallpaper.”
Step 5: Use a pencil to mark the width of the wallpaper roll at the top of the wall. Use a plumbline and pencil to mark down the length of the wall to create a straight line to help line up the first piece.
Step 6: Apply wallpaper paste thoroughly to the wall using the wallpaper roller. “Make sure you apply the paste thoroughly. The paste should be visible and about 1mm or 2mm thick,” says Ingel. Apply extra paste 15cm beyond the pencil marks to create an overhang for subsequent rolls.
Step 7: Line up the wallpaper along the pencil marks and use your hands to manoeuvre it into place. Use the rubber press roller to smooth the wallpaper into position. “Use your hand to feel for any bubbles and roll until flat.”
Step 8: Use a straight edge tool and a sharp knife to trim the excess paper at the top and bottom of the wall. Always cut away from yourself and press down to avoid cutting the wall.
Step 9: Check the roll to see the pattern repeat (usually 30cm but depends on the design) before cutting to size.
Step 10: Repeat steps six, seven and eight, applying the wallpaper next to the previous strip and taking care to match the pattern. Use your hands to move the wallpaper into place before rolling it flat.

Background from Resene Wallpaper Collection 37520-2, Resene A4 drawdown paint swatches in (from bottom to top) Resene Rice Cake, Resene Tangaroa, Resene Duck Egg Blue, Resene Stromboli and Resene Kombi. Vases painted in Resene St Kilda with stripes in Resene Tangaroa and Resene Stromboli. Other vases and ornaments in Resene Duck Egg Blue, Resene Scoria and Resene Stromboli.
Published: 22 Sep 2022
more inspiration

Thoughtful and simple DIY Mother’s Day gifts
Looking for a way to show your appreciation this Mother’s… more

Three ANZAC DIY projects to create a thoughtful tribute
Anzac Day is a national day of remembrance in New… more

Back to essentials: Nature-inspired wallpapers that ground and soothe
The Resene Essentiell Wallpaper Collection is inspired by the raw… more

Egg-stra special Easter DIYs for the whole family!
We’ve got more fun and creative Easter DIYs for you… more

Favourite finds: Our top picks for rustic, farmhouse and vintage vibes
Favourite Finds is back to showcase the best in home… more


 look book