
latest
habitat tv

Say goodbye to the morning scramble for keys, coats and sunglasses and hello to this… see this and more videos
blog

Kandinsky called, and he wants to move in!
Not all homes are made the same – and thank goodness for that! Tucked away… more
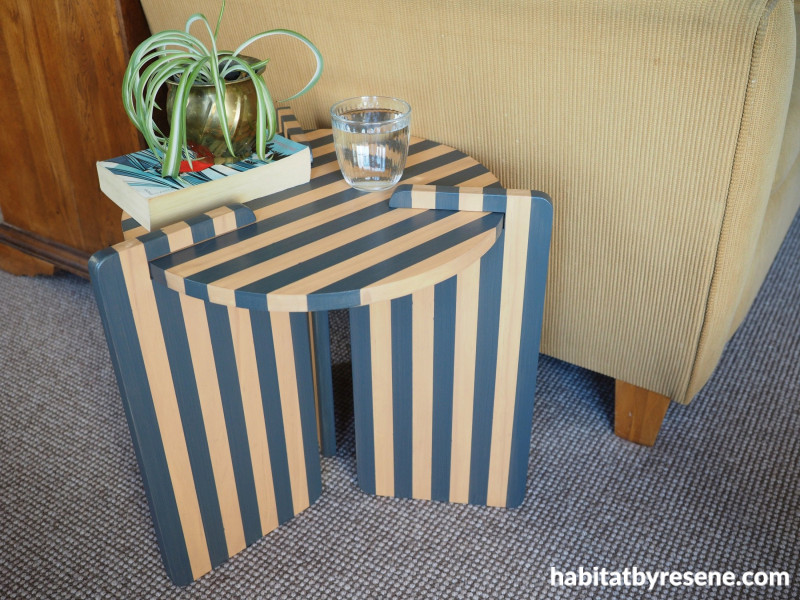
Wonders with wood: A functional and stylish DIY table
05 Jun 2025
It’s amazing what you can create with just one material – like this table which uses only wood. Itsincredible design allows it to be put together all on its own without the use of bolts or screws. It also means that you can take it down and fold it away when it’s not needed or you’d like to transport it somewhere. Choose your favourite Resene Colorwood wood stain shades or stain colour washes, or Resenetestpotpaint colours, to decorate it and make it your own!
You will need:
Untreated pine project panel, 900mm long x 400mm wide x 18mm thick
Untreated pine board, 1.8m long x 230mm wide x 18mm thick
Jig saw or band saw
Sandpaper
Paintbrush
Painters tape
ReseneColorwood Bask and ReseneColorwood Shadestain colour washes
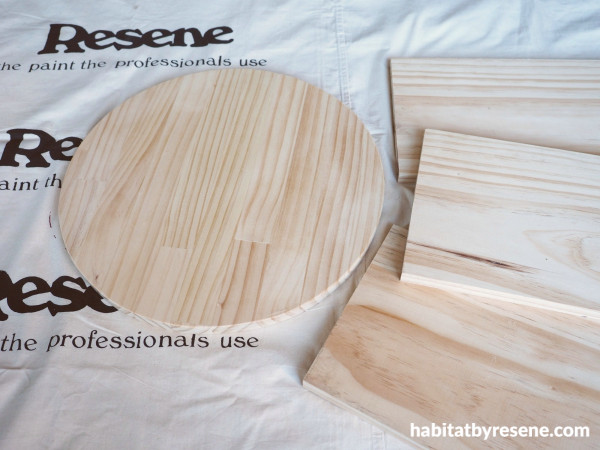
Step 1: Draw a 40cm diameter circle on to your board and cut this out with a jig saw or band saw. Sand the rough edges smooth and wipe off any dust. Cut the three legs from the 1.8m board to be 44cm long.

Step 2: Cut a notch 18mm wide at the top of each of the leg boards so that the circular top slides into the notch. Fleur made her notch 18mm down from the top of the leg board. Use a jig saw or band saw to cut this out. Sand the rough edges smooth and wipe off any dust. Trim the end of the notch to be shorter so that it doesn’t take up as much room on the tabletop. Round off all four corners of the legs.

Step 3:Stain the tabletop and legs with one coat of your chosen Resene Colorwood stain colour wash. Fleur used Resene Colorwood Bask. If you’re making a striped pattern like Fleur, use painters tape to make the stripes then apply two coats of another ReseneColorwood staincolour wash – Fleur used Resene Colorwood Shade for this step. Remove the tape and when the stain is dry, apply two coats ofResene Aquaclear in a satin finish.
Top tip: If you prefer a higher sheen finish, you can use ReseneAquaclear semi-gloss or gloss instead. The higher the gloss level the brighter your colours will look.

Step 4: Slide the round top into the legs and position the legs evenly around the table. You can use wood glue to secure the legs in place, or leave it as it is so that it’s easily collapsible when needed.
project and images Fleur Thorpe
Published: 05 Jun 2025
more inspiration

Create a seamless, clutter-free home with this innovative, modern solution
With so many appliances on the market today it's easy… more

Paws-itively practical: How to make your own playful glasses holder
If you’re sick of having no place to put your… more

Favourite Finds: Our top picks for a cosy home this winter
Favourite Finds is back to showcase the best in home… more

From duvets to dreams: Creating your perfect bedroom palette
We’re bringing you a fresh look at more of the… more

Making storage fun: How to make and paint your own DIY dog toybox
Home storage solutions don’t have to be boring, you can… more


 look book